Introduction
This was originally going to be a homework presentation for one of my courses, but it got cancelled, so I decided to share it as a blog post. In this guide, I’ll show you how to use WebSocket technology with Go and React.
What is WebSocket?
WebSocket is a communication protocol that enables bidirectional communication. This protocol provides real-time data streaming between web applications. It establishes a persistent connection between the server and client, enabling continuous data flow.
Use Cases
- Online games
- Instant messaging applications
- Real-time data analytics
- Live streaming
- Team collaboration applications, as we’ll see shortly
Terms and Concepts
In the WebSocket protocol, concepts like ping, handshake, and heartbeat are used to ensure the connection remains healthy and to prevent potential issues. The differences between these terms are as follows:
1. Handshake
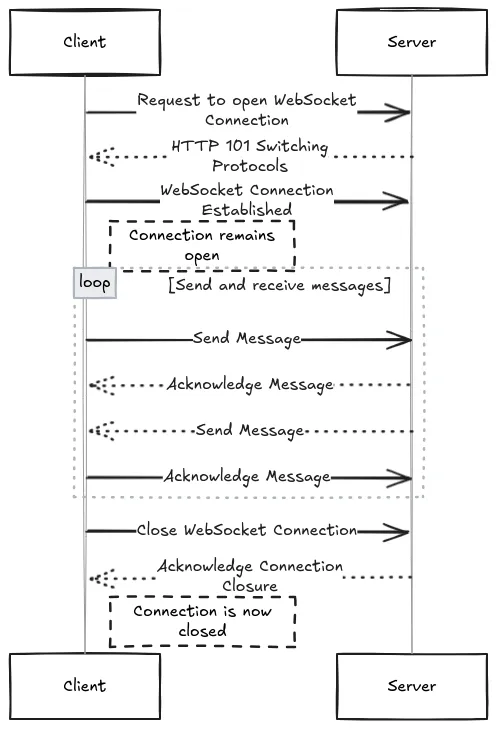
Before a WebSocket connection is initiated, a handshake process takes place between the client and server. This is the process where the client sends a request to establish a WebSocket connection and the server confirms that request.
- The client sends an HTTP request to initiate a WebSocket connection, using the
Upgradeheader to request switching the protocol to WebSocket. - The server receives this request, and if it supports the WebSocket protocol, responds with a
101 Switching Protocolsstatus code, upgrading the connection to WebSocket.
Example handshake request:
# Request sent by the client
GET /notifications HTTP/1.1
Host: example.com
Upgrade: websocket
Connection: Upgrade
# Response from the server
HTTP/1.1 101 Switching Protocols
Upgrade: websocket
Connection: Upgrade
2. Ping
Ping is a message type used to test the connection between server and client. It is sent to verify that the connection is active and both sides can hear each other.
- In the WebSocket protocol, the server periodically sends ping messages to the client.
- The client responds with a pong reply to keep the connection alive.
- If ping/pong messages are not received within a certain period, the connection is considered broken and may be terminated.
3. Heartbeat
Heartbeat is a method used to ensure the continuity of a WebSocket connection. It’s a type of ping/pong message sent at regular intervals to maintain the connection’s validity. It’s essentially an “Are you alive?” check.
- Heartbeat is typically sent automatically by the server, checking whether the client responds.
- If the client doesn’t respond within a certain period, the server may terminate the connection.
4. Close
This is a message type used to terminate the WebSocket connection. It can be sent by either the server or client to close the connection.
In Summary
- Handshake: The process of initiating the connection and switching to the WebSocket protocol.
- Ping/Pong: Messages sent to check that the connection is active.
- Heartbeat: Regular ping/pong operations performed at intervals to ensure connection continuity.
- Close: A message sent to terminate the connection.
These mechanisms are crucial for ensuring WebSocket connections remain healthy and sustainable.
ws and wss Protocols
The WebSocket protocol can operate over two different protocols:
- ws (WebSocket): The standard WebSocket protocol, typically running over HTTP.
- wss (WebSocket Secure): A secure WebSocket protocol, typically running over HTTPS.
The difference between these protocols depends on whether the connection is secure. Use ws:// for unsecured connections and wss:// for secure connections. For example: ws://codeaman.dev and wss://codeaman.dev.
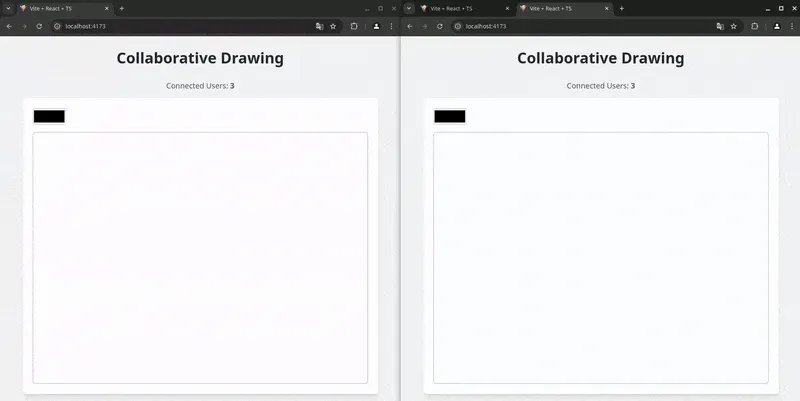
WebSocket Application with Go
In this demo, I built the backend with Go and the frontend with React.
You can find the demo repository here.
This demo uses the gorilla/websocket package. This package is used to manage WebSocket connections and process messages. The React side also uses the WebSocket API.
In this demo, we have 3 types of messages:
- clientCount: Updates the number of connected clients.
{"type":"clientCount","clientCount":4}- canvasRequest: When a new client connects, it requests the current canvas data from active users.
{"type":"canvasState","clientId":"1...","data":"data:image/png;base64,i..."}- draw: Enables drawing.
{"color":"#000000","endX":484,"endY":202,"startX":450,"startY":202}Setup
git clone https://github.com/code-a-man/ws-canvas-demo.git
cd ws-canvas-demo
npm install
cd backend
go mod download
cd ..
npm run dev
Notes
As I mentioned at the beginning, this was going to be a presentation, but when it got cancelled, I decided to share it as a blog post. I created this guide based on my own research and experiments. I hope it was helpful.